
Last Updated on February 25, 2026 by dhruwuttam58@gmail.com
Introduction
If your solar panels are only as strong as what’s holding them down, then solar panel roof mounts are the part you should never cheap out on. Most homeowners spend thousands of dollars on panels and inverters, only to ruin the whole system with weak mounts that bend in the wind, rust in a single rainy season, or, worse, create roof leaks that turn into permanent ceiling stains.
The biggest problems usually happen when people choose the wrong mounting style for their roof type, ignore rafter spacing, or install hardware without proper flashing. Even a small mistake with a bolt hole can create a leak that shows up months later, not immediately.
This is why choosing the right solar panel mounting brackets and rails matters just as much as choosing the panels.
In this 2026 update, I’ll break down what works, what doesn’t, and what I personally recommend for different roof types, wind zones, and DIY installs.
What you’ll learn: types of mounts, bracket vs rail differences, leak prevention tips, cost breakdown, and what to buy in 2026.
Table of Contents
What Are Solar Panel Roof Mounts?
Solar panel roof mounts are hardware that securely attach panels to a roof structure. They’re designed to hold panels steady against wind uplift, heavy rain, vibration, and (in cold regions) snow load.
A proper solar roof mounting system usually includes:
- Mounting feet or base plates
- Flashing or waterproof seals
- Rails (or rail-less clamps)
- Mid clamps and end clamps
- Grounding parts (bonding washers, lugs)
- Bolts, nuts, and stainless fasteners
Most homeowners think the panel is the “main part,” but in reality, solar panel roof mounts determine whether your system stays safe for 20+ years or becomes a maintenance nightmare.
In 2026, modern solar panel roof mounts are better engineered, lighter, and more corrosion-resistant—but only if you buy quality brands and install them correctly.
What are solar panel roof mounts?
Solar panel roof mounts are metal brackets, rails, and fasteners that attach solar panels securely to a roof while preventing leaks and resisting wind pressure.
Solar Panel Mounting Brackets: What They Are and Why They Matter
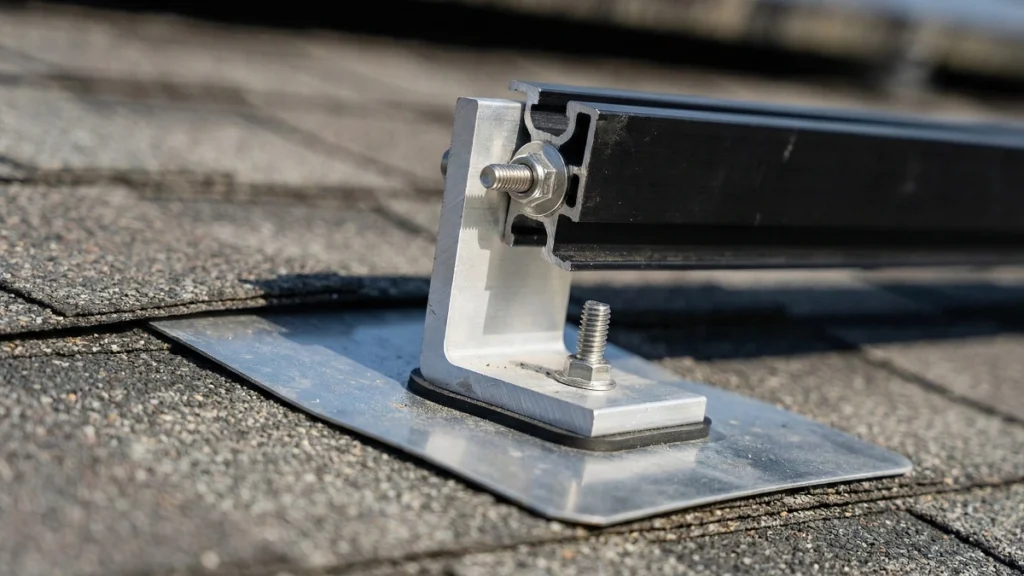
Solar panel mounting brackets are the key connection points between your roof and your solar panel frame. They’re the parts that take the most stress because they handle:
- Wind uplift pulls the panels upward.
- Downward weight load from panels + snow
- Long-term vibration and thermal expansion
- Roof movement during temperature changes
If you purchase low-quality solar panel mounting brackets, you may encounter the following issues:
- Rust and corrosion after one monsoon season
- Loose bolts and shifting rails
- Weak aluminum cracking under load
- Poor sealing around bolt holes
In a good system, solar panel mounting brackets are engineered with adjustable slots, stainless fasteners, and compatible flashing.
A smart buyer focuses on bracket quality first, because once brackets fail, the entire solar system becomes unsafe.
Bottom line: solar panel mounting brackets are not “optional accessories.” They are the backbone of your rooftop solar.
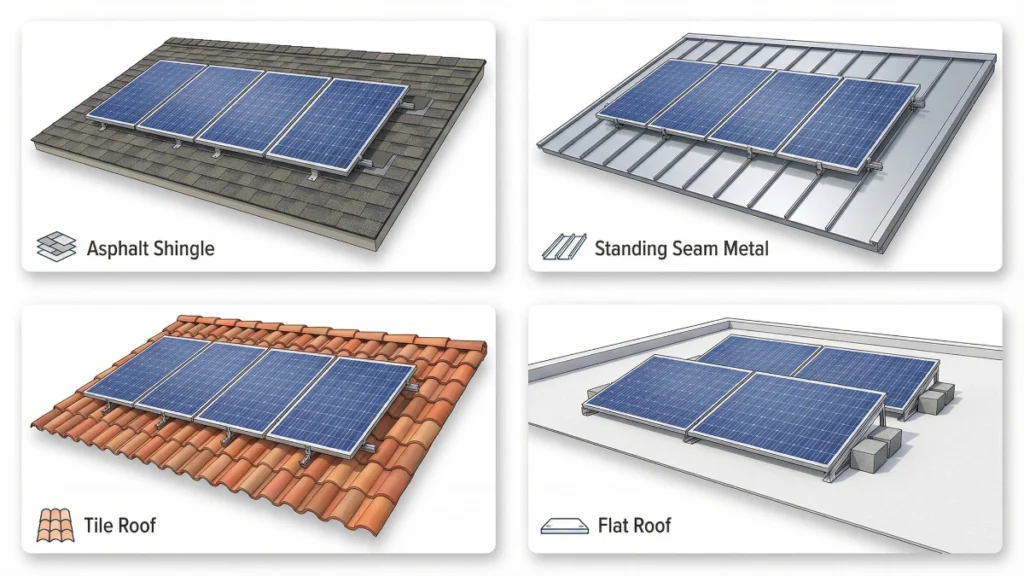
Types of Solar Panel Roof Mounts (With Comparison Table)
Different roofs require different solar panel roof mounts, and in 2026, buyers have more options than ever. Some mounts are best for flush aesthetics, while others are designed for tilt angles, off-grid roofs, or metal standing seam systems.
Below is a simple comparison table to help you decide before buying.
Comparison Table: Solar Panel Roof Mount Types
| Mount Type | Best Roof Type | Pros | Cons | Best For |
|---|---|---|---|---|
| Flush Mount (Fixed Angle) | Asphalt shingles, metal roofs |
Low-profile look Strong wind resistance Simple installation |
No angle adjustment Slightly lower winter performance | Home rooftop solar systems in windy areas |
| Tilt Mount (Adjustable) | Flat roofs, low-slope roofs |
Better winter performance Adjustable tilt angle Helps maximize output |
More hardware needed Higher wind load risk if poorly installed | Off-grid users and high-output rooftop setups |
| Rail-Based Mounting System | Asphalt, tile, and metal roofs |
Most common and reliable Strong panel alignment Easier panel replacement later |
Slightly heavier More components to install | Homeowners who want long-term durability |
| Rail-Less Mounting System | Metal roofs, some asphalt roofs |
Faster installation Less hardware Cleaner look |
Less forgiving on uneven roofs Panel alignment must be perfect | Installers and DIY users who want speed |
| Standing Seam Metal Roof Clamps | Standing seam metal roofs |
No roof drilling required Excellent leak protection Strong hold and clean install |
Only works on standing seam roofs Clamps can be expensive | Metal roof owners who want a non-penetrating system |
| Ballasted Mounting System | Flat commercial roofs |
No drilling into the roof membrane Quick setup for large arrays |
Heavyweight load Not ideal for residential roofs | Commercial solar installations on flat roofs |
Tip: On mobile, swipe left or right to view the full table.
If you’re comparing options, rail-based solar panel roof mounts still dominate in residential installs because they’re forgiving and easy to align.
Solar Panel Mounting Brackets vs Mounting Rails (Simple Explanation)
This confuses many DIY buyers.
Solar panel mounting brackets
These attach directly to the roof structure (rafters/trusses). They’re the “foundation.”
Solar panel mounting rails
Rails are long aluminium tracks that connect multiple brackets and provide a straight line for panel attachment.
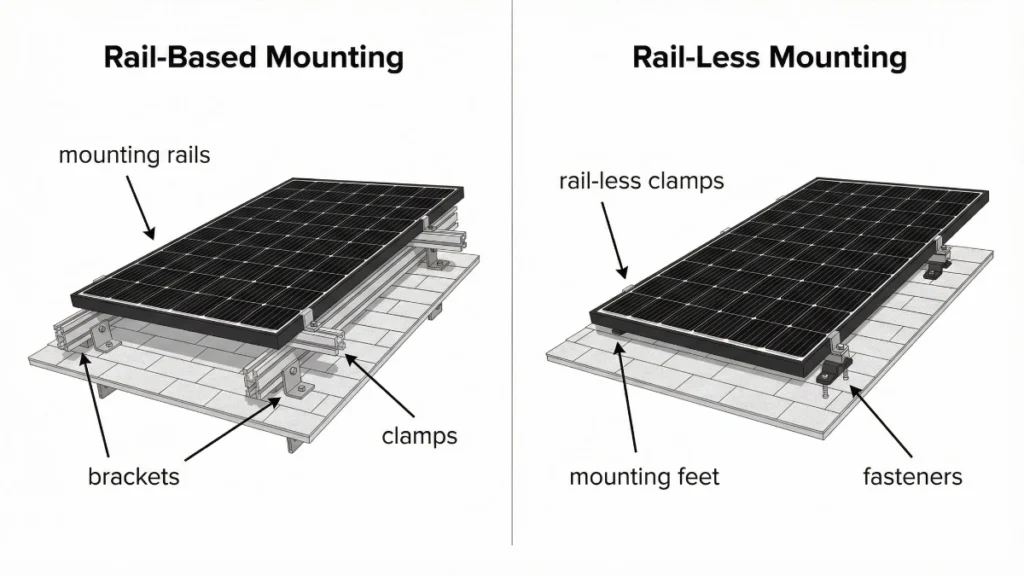
Simple way to remember:
- Brackets = roof connection
- Rails = panel alignment track
A good solar panel mounting rails setup makes panel spacing easier and distributes weight evenly. In most rooftop systems, brackets + rails work together.
If you’re doing DIY, I usually recommend rail-based systems because they give you adjustment room if your measurements are slightly off.
Roof Type Compatibility Guide (Asphalt, Metal, Tile, Flat)
Choosing solar panel roof mounts without checking roof type compatibility is the fastest way to cause leaks and cracked tiles.
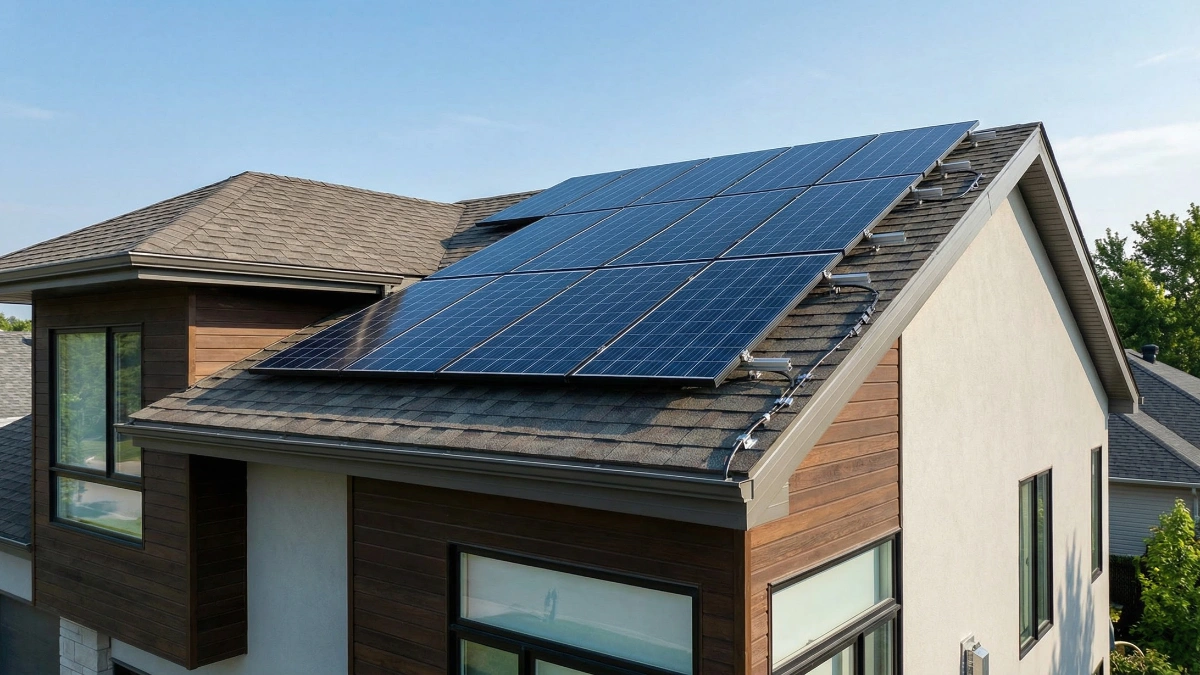
Asphalt Shingle Roof
Asphalt shingles are the most common and the easiest to install for solar.
Best mount options:
- Rail-based mounts with flashing
- Flush mounts with L-feet brackets
Practical advice:
- Always anchor into rafters (not just plywood)
- Use proper flashing, not only sealant
- Don’t overtighten lag bolts
Asphalt roofs work great with solar panel mounting brackets, but only if flashing is done correctly.
Metal Roof (Standing Seam vs Corrugated)
Standing Seam Metal Roof
This is the best roof type for solar.
Best option:
- Standing seam clamps (no drilling)
Advantages:
- No roof penetration
- Cleaner look
- Fast installation
If your roof is standing seam, you can often install a full solar roof mounting system without a single hole.
Corrugated Metal Roof
This requires drilling.
Best option:
- Rail-based mounts with EPDM sealing washers
Watch out for:
- Wrong screw placement on ridges
- Cheap rubber washers crack after heat exposure
Tile Roof
Tile roofs are tricky and expensive to repair.
Best mount options:
- Tile hooks
- Elevated rail mounts
Avoid:
- Direct drilling through tiles without proper tile replacement hooks
Tile roof installs are not beginner-friendly. You need the right solar panel roof-mounting hardware, or you’ll crack tiles quickly.
Flat Roof
Flat roofs need special design because wind pressure can flip panels like sails.
Best options:
- Ballasted flat roof mounts
- Tilt mounts with wind deflectors
Important note:
Ballasted mounts avoid roof penetration but increase structural load, which must be verified against the roof’s load capacity.
Slate Roof
Slate is beautiful but fragile.
Best option:
- Specialised slate hooks (professional install recommended)
Professional recommendation: If you have slate roofing, don’t do this yourself. One broken slate tile can cost more than a whole rail kit.
Materials Used in Solar Roof Mounting Hardware
Quality solar panel roof mounting hardware is built to withstand harsh sun, rain, wind, and corrosion for 20–30 years.
Here are the most common materials used:
Aluminum (Most Common)
Aluminium is lightweight and corrosion-resistant, which is why rails and frames are made from it.
Look for:
- Anodised aluminium finish (better corrosion protection)
Stainless Steel (Critical Parts)
Most bolts, clamps, and fasteners should be stainless steel.
Best grade:
- 304 stainless (good)
- 316 stainless (best for coastal areas)
Galvanised Steel (Budget Option)
Some mounts use galvanised steel, but long-term corrosion resistance depends on the coating quality.
In 2026, I recommend avoiding cheap, unknown steel mounts.
For long-term durability, prioritise high-quality mounting hardware made from anodised aluminium and stainless steel.
How to Mount Solar Panels on a Roof (Step-by-Step)
If you’re searching for how to mount solar panels on a roof, you’re probably planning DIY or at least want to understand the process before hiring someone.
Here’s the real-world step-by-step flow.
Step 1: Layout and Planning
Start by determining:
- Panel placement
- Row spacing
- Shade-free roof zone
Use a solar calculator tool such as NREL PVWatts to estimate production:
Also, check your energy needs (this guide helps):
How many solar panels do you need for 50 kWh per day?
Step 2: Finding Rafters
This is where many DIY installers make mistakes.
Use:
- Stud finder
- Attic measurement
- Chalk line snapping
You want bracket spacing aligned with rafters, not random roof decking.
Step 3: Drilling and Flashing
Drill pilot holes first, then install flashing before lag bolts.
Important:
- Never rely only on sealant
- Use flashing designed for asphalt or metal
If you do this wrong, improper installation may result in leaks during the first rainy season.
Step 4: Installing Rails and Brackets
Install solar panel mounting brackets first, then attach rails.
Use a level tool and measure diagonals.
This is where solar panel mounting rails make life easier, as they let you adjust the alignment.
Step 5: Panel Clamps and Alignment
Attach panels using:
- End clamps (outer edges)
- Mid clamps (between panels)
Don’t overtighten clamps. Aluminium expands in heat.
Step 6: Grounding and Final Inspection
Bond rails and panels properly.
If you’re unsure, read this related guide:
Solar Inverter Installation Complete Guide
Final checks:
- All bolts torqued properly
- No exposed roof holes
- Rails aligned
- No loose wiring touching the roof
This outlines the correct process for safely mounting solar panels on a roof.
How to Prevent Roof Leaks (Must Be Strong)

Roof leaks are the #1 complaint after bad solar installs—not panel failure or inverter failure.
Here’s what works.
Best Flashing Methods
The best method depends on the roof type:
- Asphalt roof: Aluminium flashing + lag bolt mount
- Metal roof: EPDM washer + proper bracket base
- Tile roof: Tile hook + raised flashing
Sealant Tips That Actually Work
Use sealant only as a secondary barrier.
Best practices:
- Use high-quality roofing sealant (UV-resistant)
- Apply sealant under flashing, not just on top
- Avoid cheap silicone that cracks in heat
Do’s and Don’ts (Important)
✅ Do
- Use flashing on every roof penetration
- Seal pilot holes before inserting bolts
- Torque bolts correctly (not too tight)
- Use stainless hardware in rainy/coastal areas
- Re-check bolts after 30 days
❌ Don’t
- Install brackets into plywood decking only
- Skip flashing and depend on the sealant
- Mix random bracket brands with incompatible rails
- Drill near roof valleys where water flows
- Leave exposed screw heads
If your goal is long-term safety, avoid taking unnecessary risks. Even high-quality mounts become ineffective if they cause leaks.
Wind Load and Snow Load Considerations
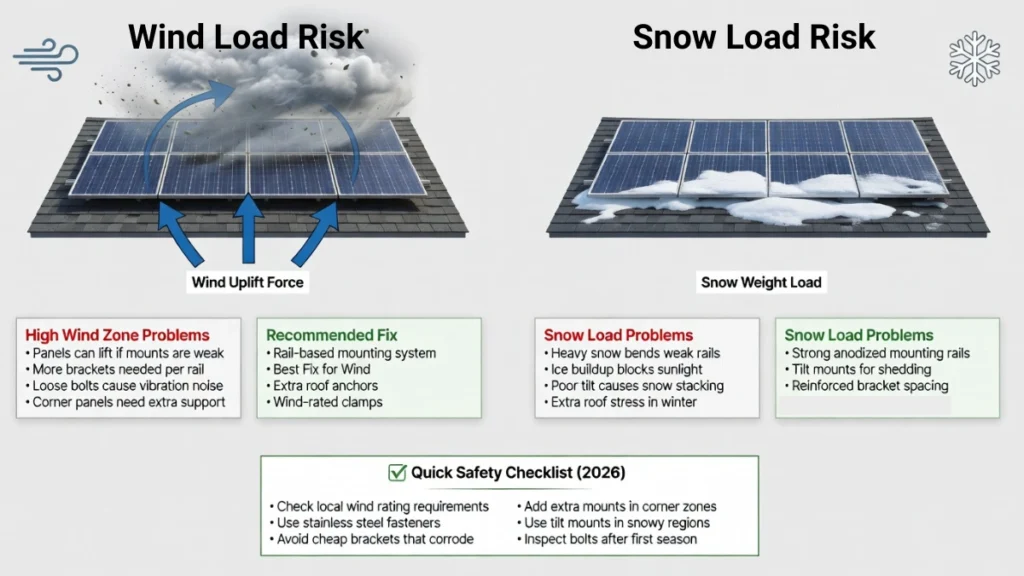
If you live in a high-wind zone, rooftop solar becomes a structural project, not just a DIY upgrade.
Wind Load (Simple Explanation)
Wind tries to lift the panels upward like an aeroplane wing.
High-risk areas include:
- Coastal zones
- Hilltop homes
- Open farmland regions
For these areas:
- Use more brackets per rail
- Use rail-based mounts for strength
- Choose mounts rated in accordance with your local building code wind-load standards.
Snow Load (Simple Explanation)
Snow adds weight and also blocks sunlight.
If snow is common:
- Tilt mounts improve shedding
- Strong rails prevent bending
If you’re using a solar roof mounting system, always check the mount’s rated load specifications.
DIY vs Professional Installation (Honest Advice)
DIY solar mounting is possible, but not for everyone.
DIY Pros
- Saves labor cost
- Full control over quality
- Great learning experience
DIY Cons
- Risk of roof leaks
- Hard to align rails perfectly
- Electrical grounding mistakes can be dangerous
- Warranty issues if installed incorrectly
Professional Pros
- Faster install
- Proper sealing tools and experience
- Better compliance with codes
Professional Cons
- Higher labor cost
- Some installation contractors rush the flashing process, increasing the risk of leaks.
My recommendation
If your roof is asphalt and you’re comfortable with drilling + flashing, DIY can work.
But for tile roofs, slate roofs, and high-wind zones, I strongly recommend hiring a professional.
If you’re building an emergency backup setup, also check:
Solar generator for home backup guide
and
Portable solar power guide
Solar Panel Roof Mount Cost Breakdown (Hardware + Labour)
Costs vary depending on roof type, mount style, and installation difficulty.
Cost Table (2026 Ranges)
| Cost Component | Typical Price Range (USD) | What It Includes | Notes |
|---|---|---|---|
| Mounting Brackets & Flashing | $100 – $350 | L-feet, flashing kits, roof attachments | Tile and metal roof hardware costs more |
| Mounting Rails | $150 – $500 | Aluminum rails, splices, and rail supports | Longer arrays require more rail sections |
| Clamps & Fasteners | $50 – $200 | Mid clamps, end clamps, bolts, nuts | Stainless steel is preferred for corrosion resistance |
| Grounding Hardware | $20 – $120 | Ground lugs, bonding clips, and grounding wire | Often overlooked in DIY installs |
| Professional Installation Labor | $500 – $2,000+ | Roof mounting, sealing, rail setup, panel mounting | Depends heavily on roof height and complexity |
| Total Roof Mount System Cost | $300 – $3,000+ | Complete mounting hardware + installation | Tile roofs and steep roofs are the most expensive |
Tip: On mobile, swipe left or right to view the full table.
If you’re also comparing full system ROI, use:
Solar ROI calculator for India and the US
Buying Guide: What to Look for in Solar Panel Roof Mounts
Buying solar panel roof mounts is not about picking the cheapest kit. It’s about long-term safety.
Roof Mount Checklist Before You Buy
Before choosing solar panel roof mounts, use this checklist to avoid roof leaks, compatibility issues, and wasted money.
- Confirm your roof type (asphalt, metal, tile, flat, slate) and choose mounts designed for it.
- Check rafter spacing so mounting points hit solid structural support, not weak decking.
- Choose corrosion-resistant materials (anodized aluminum rails + stainless steel bolts).
- Verify flashing kits are included (sealant alone is not a long-term leak solution).
- Look for wind and snow load ratings if you live in storm-heavy or winter regions.
- Decide between rail-based and rail-less based on roof shape, alignment needs, and maintenance ease.
- Confirm panel compatibility (clamp size, frame thickness, and mounting slot design).
- Check grounding requirements and ensure bonding clips/lugs are included if needed.
- Make sure the warranty is strong (10+ years is ideal for quality mounting hardware).
- Factor in long-term maintenance (bolt access, tightening later, and corrosion resistance).
- Avoid unknown cheap kits that lack proper flashing, tested strength ratings, or certifications.
- If you’re unsure, consult a professional—roof repair costs far more than mounting hardware.
Quick tip: If your roof is already old, brittle, or leaking, fix it first. Solar mounting is not the place to gamble.
Quick Recommendation (Based on Roof Type)
- Asphalt shingles: Rail-based mounts with proper flashing kits are usually the safest long-term choice.
- Standing-seam metal roof: Clamp-based mounts are best because they avoid drilling and reduce the risk of leaks.
- Tile roofs: Tile-specific hooks and reinforced mounting points are essential (cheap kits often fail here).
- Flat roofs: Tilt mounts or ballasted systems work best for performance and easy panel cleaning.
- DIY installations: Stick with complete rail kits from reputable brands with clear manuals and support.
If you’re building a solar + portable backup setup, this post helps too:
200W portable solar panel review
Also, if you want more solar gadget ideas:
Solar energy gadgets for sustainable living
and
How solar gadgets are changing daily life
Common Mistakes Homeowners Make
Most solar panel roof-mount problems don’t occur because the panel is bad. They happen because people rush the decision about mounting hardware. These are the most common mistakes that lead to leaks, weak installations, and expensive repairs.
- Expecting sealant alone to stop leaks instead of using proper flashing kits.
- Mounting without hitting the rafters, results in weak support and long-term structural damage.
- Buying cheap, unknown mounting kits that rust quickly or fail under strong wind pressure.
- Ignoring wind and snow load ratings, especially in storm-prone or winter regions.
- Mixing incompatible brackets and rails, causing alignment issues and loose clamps.
- Choosing the wrong mount type for the roof (tile roofs and metal roofs need specialized hardware).
- Over-tightening bolts can crack shingles, damage tiles, or weaken waterproof seals.
- Skipping grounding and bonding hardware is a major safety risk.
- Not leaving space for airflow can reduce panel efficiency and trap heat on the roof.
- Installing on an old roof that should have been repaired or replaced first.
Smart rule: If a mounting kit looks too cheap to be true, it usually is. Roof mounting hardware should last as long as your solar panels.
FAQ About Solar Panel Roof Mounts
What are solar panel roof mounts?
They are brackets, rails, and clamps that attach solar panels securely to a roof structure.
Are solar panel mounting brackets universal?
No. Brackets vary by roof type, rail system, and panel frame size.
How to mount solar panels on the roof without leaks?
Use proper flashing, seal pilot holes, and always anchor mounts into rafters—not just decking.
What is better: rail-based or rail-less mounts?
Rail-based systems are easier to align and are ideal for DIY installs. Rail-less systems are faster but less forgiving.
Do solar panel roof mounts damage the roof?
They can if installed incorrectly. Proper flashing prevents leaks and protects shingles.
Can you install solar mounts on a metal roof?
Yes. Standing seam roofs are easiest because clamp mounts avoid drilling.
How much do solar panel roof mounts cost?
Most mounting hardware + labour ranges from $1,200 to $3,500, depending on roof type and system size.
What type of mounting is best for high wind zones?
Rail-based mounts with extra brackets and strong flashing systems are usually safest.
How long do solar panel mounting rails last?
Good anodised aluminium rails typically last 20–30 years with minimal corrosion.
What is the safest roof mounting method?
Standing-seam clamp mounts (for seam roofs) and flashed-rail mounts (for asphalt roofs) are the safest.
Final Verdict (2026 Recommendation)
In 2026, the best solar panel roof mounts are those that match your roof type, weather conditions, and installation skill level—not the cheapest kit online.
Here’s what I recommend:
- Asphalt shingle roofs: rail-based flashed mounts (most reliable)
- Standing seam metal roofs: clamp mounts (no drilling, no leaks)
- Tile roofs: tile hooks with raised rails (professional install preferred)
If you’re doing DIY, choose a system with strong solar panel mounting brackets, anodised rails, and stainless steel fasteners. Avoid cheap off-brand kits, as once corrosion starts, it spreads quickly.
My honest opinion: Solar panel roof mounts are one of the few solar components where “budget” can turn into a disaster. Spend a little more upfront, and you’ll avoid leaks, repairs, and storm damage later.
If you’re comparing complete backup solutions alongside rooftop installs, also read:
Solar generator backup guide
In short: choose quality mounts, install with patience, and treat the roof like a long-term investment.
About the Author
SolarGizmoGuide is an independent solar research and publishing platform focused on practical, real-world solar solutions for urban homes and apartments. Our editorial team analyzes solar gadgets, mounting systems, backup power systems, and portable solar technology to help readers make informed investment decisions.
All content is based on independent research, manufacturer technical documentation, and publicly available performance data. Articles are reviewed and updated periodically to reflect current installation standards, safety considerations, and evolving solar technology.